CSS Tutorial: CSS and XHTML Website Programming
CSS & XHTML programming to build your website with Dreamweaver

Once you have set-up your web site using Dreamweaver you are ready to program your website with CSS and XHTML programming. On completing this tutorial series step you will have nearly finished the cool website shown on the left.
As part of our free CSS website design guide this tutorial now continues with the next step in creating the smart website shown on the left. Learn how to CSS and XHTML program your website with Dreamweaver - this is the second step in building your designed and exported website with Dreamweaver.
Prerequisite Knowledge
For this step and the next, you need to have some basic CSS programming knowledge to clearly understand what's being done. At least you need to read our CSS styles tutorial.
You Are Here ::: Home >> Free Tutorials >> Website Design with Dreamweaver & Fireworks >> Website Layout Design
Step 5: CSS & XHTML programming your website with Dreamweaver
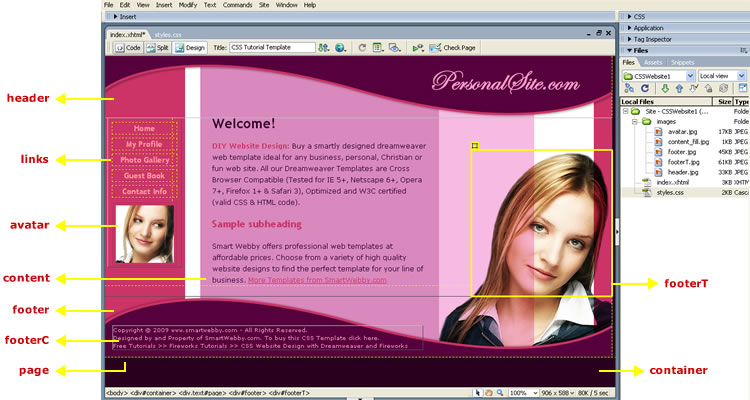
In the previous tutorial you learnt how to set up your website in Dreamweaver. Now you are going to learn how use the exported images in Step 2 to create your XHTML page with Dreamweaver using CSS and XHTML programming. See the illustration below that will show how your DIVs are arranged for the index.xhtml file in Dreamweaver.
XHTML Programming
Step 1: Let us first create your XHTML page. In Dreamweaver, the files will be displayed in the Files Panel (Window >> Files or F8) under Local Files. Right click on the first folder visible in the list with the Site Name; now select New File. A new html file will be created in your website folder. Rename the file as index.xhtml. Now double click on it so the document opens up.
Step 2: In the index.xhtml document left top you will find three buttons Code, Split and Design to access different views. Click the Code View button; Select all (Ctrl+A) and delete. Now copy-paste the code shown below into it and save your file:
<html xmlns="http://www.w3.org/1999/xhtml">
<head>
<meta http-equiv="Content-Type" content="text/html; charset=iso-8859-1" />
<title>CSS Tutorial Template</title>
<link rel="stylesheet" type="text/css" href="styles.css">
</head>
<body>
<div id="container" align="center">
<div id="page" class="text" align="left">
<div id="header"></div>
<div id="links" align="center"><a href="#">Home</a> <a href="#">My Profile</a> <a href="#">Photo Gallery</a> <a href="#">Guest Book</a> <a href="#">Contact Info</a> <img src="images/avatar.jpg" alt="" width="114" height="112" border="0" vspace="2" hspace="8" /></div>
<div id="content"><h1>Welcome! </h1>
<p><strong class="subtitle">DIY Website Design:</strong> Buy a smartly designed dreamweaver web template ideal for any business, personal, Christian or fun web site. All our Dreamweaver Templates are Cross Browser Compatible (Tested for IE 5+, Netscape 6+, Opera 7+, Firefox 1+ & Safari 3), Optimized and W3C certified (valid CSS & HTML code). </p>
<h2>Sample subheading </h2>
<p>Smart Webby offers professional web templates at affordable prices. Choose from a variety of high quality website designs to find the perfect template for your line of business. <a href="#">More Templates from SmartWebby.com</a> <a href="#"></a> </p>
</div>
<div id="clearfloats"></div>
<div id="footer" align="left"><div id="footerT"><img src="images/footerT.jpg" alt="" width="250" height="260" border="0" /></div><div id="footerC">Copyright © 2009 <a href="http://www.smartwebby.com">www.smartwebby.com</a> - All Rights Reserved. <br />
Designed by and Property of SmartWebby.com. To buy this CSS Template click here. <br />
<a href="http://www.smartwebby.com/resources.asp" target="_blank">Free Tutorials</a> >> <a href="http://www.smartwebby.com/free_tutorials/fireworks_tutorials/" target="_blank">Fireworks Tutorials</a> >> <a href="http://www.smartwebby.com/free_tutorials/CSS_website_design_guide/CSS_web_design_dreamweaver_fireworks.asp" target="_blank">CSS Website Design with Dreamweaver and Fireworks</a>
</div>
</div>
</div>
</div>
</div>
</div>
</body>
</html>
The code within the body tag contains the various DIV tags required to display the various parts of the design. See in the image above what each DIV tag displays. In novice speak, we have divided the layout into five general sections: header, footer, links, content and the footer picture top, apart from the page's background container.
Notice in the index.xhtml page code how we have linked to an external style sheet called styles.css (which includes style specifications of the DIV tags shown in the screenshot above). The line of code that does this is shown below:
<link rel="stylesheet" type="text/css" href="styles.css">
Let us now create and see how this CSS style sheet works.
CSS Programming
Moving on to the CSS programming part:
Step 1: Right click the files panel as before and select New File to create a new document. A new html file will be created in your website folder. Rename the file as styles.css. Now double click on it so the document opens up.
Step 2: A style sheet has only one view, the Code view, and so will have no default code inside it (if it does, once again select all (Ctrl+A) and click delete). Now copy-paste the code shown below into it and save your file:
body{
margin:0px;
padding:0px;
background:#2A001E;
color:#330033;
font-family:Verdana, Arial, Helvetica, sans-serif;
font-size:12px;
}
#container{
width:100%;
}
#page{
width:900px;
position:relative;
background:url(images/content_fill.jpg) repeat-y;
z-index:1;
}
#header{
width:900px;
height:110px;
background:url(images/header.jpg) no-repeat;
}
#links{
position:relative;
float:left;
left:5px;
top:0px;
margin-bottom:30px;
width:114px;
}
#links a{
color:#FF9999;
font-size:14px;
font-weight:bold;
font-family:"Trebuchet MS", Verdana, Arial, Helvetica, sans-serif;
text-decoration:none;
display:block;
border:1px solid #B32D58;
margin:8px;
width:112px;
}
#links a:hover{
color:#FFFFFF;
}
#avatar{
position:relative;
float:left;
left:15px;
top:0px;
}
#content{
padding:0px 330px 0 190px;
line-height:20px;
z-index:2;
}
#clearfloats{
clear:left;
}
#footer{
clear:both;
width:900px;
height:108px;
background:url(images/footer.jpg) no-repeat;
}
#footerT{
position:absolute;
float:right;
bottom:108px;
right:0px;
height:260px;
width:250px;
z-index:3;
}
#footerC{
position:relative;
top:53px;
width:550px;
margin:0 20px 20px 14px;
color:#FF99CC;
font-size:10px;
line-height:15px;
}
#footerC a{color:#FF99CC;text-decoration:none;}
#footerC a:hover{color:#FFFFFF;text-decoration:underline;}
Most of the style sheet code is self explanatory when you go through it (especially if you know some CSS programming). All the ID attribute styles are for the various DIV tags that make up the design. Compare each ID style specification with the above screenshot to understand the basic logic of the CSS design.
You have now successfully created the XHTML & CSS web page layout using Dreamweaver!
The next step is to Format your web pages using CSS styles in Dreamweaver.
Setting up your website in Dreamweaver || Continue to Step 6: Format your text content using CSS Styles
This CSS website design guide teaches layout design with Fireworks and CSS/XHTML website conversion with Dreamweaver. Learn CSS Web Design by following these simple steps:
- Introduction: How to make a Website
- Layout Design: Designing the website's layout with Fireworks
- Export Images: Slicing and Exporting the website images with Fireworks
- Dreamweaver Site: Setting up the website in Dreamweaver
- CSS Tutorial: CSS and XHTML website programming with Dreamweaver
- CSS Styles: Formatting the web pages using CSS style sheets in Dreamweaver
Software Required
Compatible Versions of Dreamweaver for this Tutorial
Note: The instructions in this tutorial are same across all Dreamweaver versions listed above; Screenshot images (if any) may differ. Adobe CS4+ users: Read the CS4+ version of this web design tutorial series - Design a Website. Recommended Version: Dreamweaver CS6