Fireworks Web Design
Designing the website's layout with Fireworks
 To create your own website with Dreamweaver and Fireworks you need to first create your web page design using Fireworks. As part of our free CSS website design guide this tutorial teaches you how to design the smart website layout on your right. The steps involved in doing this are:
- Designing the website's header and footer
- Designing the website's background and navigation
- Placing photos and content into the website's design
In this chapter we will cover Step A of the layout design process - designing the website's header and footer.
You Are Here ::: Home >> Free Tutorials >> Website Design with Dreamweaver & Fireworks >> Website Layout Design
Step 2A: Designing the website's Header and Footer with Fireworks
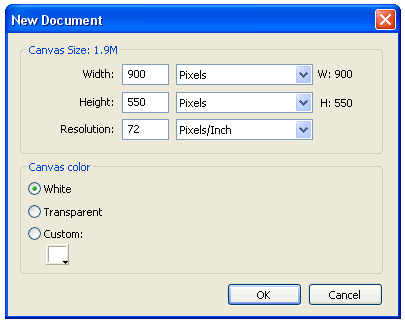
To start with you need to create a new document in Fireworks with the dimensions of 900 x 550 pixels. To do this open Fireworks, select File >> New (Ctrl+N), the 'New Document' properties window will pop-up (see image below), where you need to enter the Canvas Size as Width: 900 pixels, Height: 550 pixels, Resolution: 72 pixels/inch and the Canvas Color to be white. Click the ok button and your document window will appear.
Designing the Header
We are going to design the header part of the design (purple curve with the site name “PersonalSite.com”). To do this:- Create a curve for the header: Using the Rectangle Tool
 which is displayed under Vector on the left hand side of the tool bar (Window >> Tools) - draw a rectangle with the dimensions of 900x139 (width: 900 and height: 139).
 - Now select the rectangle set Stroke color as #CC3366 and Fill color as #56003D. The Stroke colors and Fill colors are displayed under Colors on the left hand side of the tool bar (or in the properties panel). Set the Stroke Category to Pixel Soft (Pencil >> 1-Pixel Soft) and the Tip size to 4 pixels.
- Now you are going to convert the rectangle to a neat curve using the Subselection Tool
 and the Pen Tool
  . Look at the example below, you will see how you can step-by-step create a uniform curve.
 - Step 1: Click on rectangle and select one of its points using the Subselection Tool . While selecting the point Fireworks might tell you that the object is going to be ungrouped, click ok.
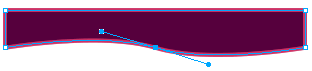
- Step 2: Using the Pen Tool place a point on the bottom line of the rectangle (approximate center) and without releasing the point drag your mouse (click+drag). The curve handles of the point will appear. Release the click.
- Step 3: To adjust the curve, just click the point just created and adjust the curve by clicking and dragging either of the curve handles.
- Now you have converted the rectangle to a neat curve. You now need to make the top and side lines of the curved box invisible. To do this first increase the size of the curve as 909 pixels (W: 909 pixels) using Scale Tool
 and move the curve slightly (X:-2 pixels and Y:-36 pixels) outside the document window (anything outside the document window is becomes invisible). Note: The W, H, X and Y are displayed under Properties (Window >> Properties). See the picture below to see how your curve should appear.
 -
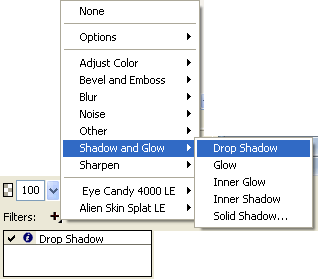
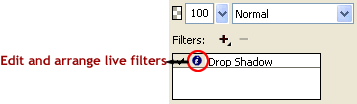
Now we need to apply a shadow effect to the curve. Click to select the curve. Now on the right side of the properties window, you will find Filters, click over the + symbol and choose Drop Shadow from Shadow and Glow option. Click on the tiny blue circle with "i" next to the Drop Shadow filter (Edit and arrange live filters button) and set the following values for the filter: Opacity – 30%, Softness – 4, Angle – 319, Distance – 3, Color - #000000.
-
Create the site name text: Click the Text tool
 , choose Font - Edwardian Script ITC, Font Size - 50, Color - #FF99CC, Font Weight - bold, Anti-aliasing level - Smooth Anti-Alias and write your site name (as you like) on the right hand side of your curve, we have used 'PersonalSite.com' as the site name. The image below shows the Properties Window in which you can set the font type, size and color:
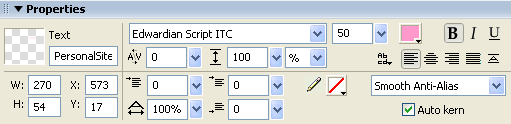
You have successfully created the header part of the design with Fireworks. The header should finally look similar to the below image:


Designing the Footer
The effect used in the footer of our design is the same as the effect used in header, except that the curve is reversed in direction.
- To create the footer curve, select the header curve with the Pointer Tool
 and then press "Alt + down arrow" (or copy-paste) to duplicate it.
 - Select and move the duplicate curve down so all its points are visible.
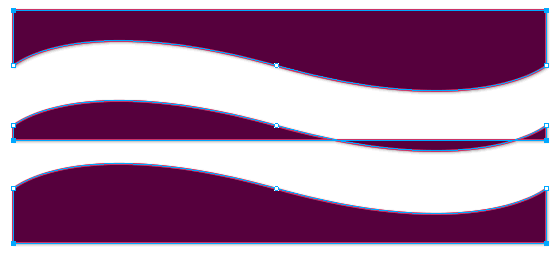
Now select the above two points (straight line) using the Subselection Tool as shown below.
Press "Shift + down arrow" to move the line vertically down till it goes below the points of the curve.
See the illustration below that shows how to create the footer curve.
- Adjust the shadow of the footer curve by clicking the Edit and arrange live filters (tiny blue circle with "i") next to Drop Shadow and set its angle to 151, so that the shadow now appears above the curve.
- Create the footer text: Click the Text Tool , choose Font - Verdana, Font Size - 10, Color - #FF99CC, Anti-aliasing level - No Anti-Alias and write your footer text on the left hand side of the footer curve.
Great! you have now completed the first step in creating your own website - Header and Footer design. The resultant design should look similar to the below image.

The next step is designing the website's background and navigation.
CSS Website Design Guide || Continue to Step 2b: Designing the website's background and navigation
This CSS website design guide teaches layout design with Fireworks and CSS/XHTML website conversion with Dreamweaver. Learn CSS Web Design by following these simple steps:
- Introduction: How to make a Website
- Layout Design: Designing the website's layout with Fireworks
- Export Images: Slicing and Exporting the website images with Fireworks
- Dreamweaver Site: Setting up the website in Dreamweaver
- CSS Tutorial: CSS and XHTML website programming with Dreamweaver
- CSS Styles: Formatting the web pages using CSS style sheets in Dreamweaver
Software Required
Compatible Versions of Fireworks for this Tutorial
Note: The instructions in this tutorial are same across all Fireworks versions listed above; Screenshot images (if any) may differ. Adobe CS4+ users: Read the CS4+ version of this web design tutorial series - Design a Website. Recommended Version: Fireworks CS6