Website Photos & Content Insertion
Placing photos and sample content in the website's design with Fireworks
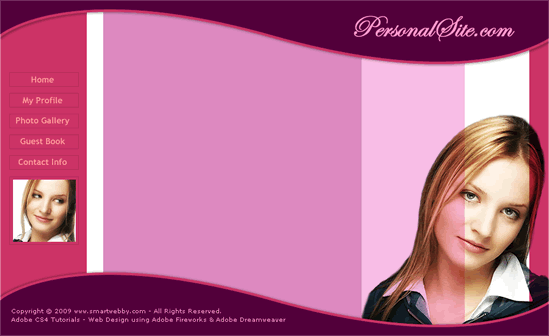
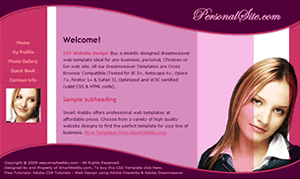 To create your own website with Dreamweaver and Fireworks you need to first create your web page design using Fireworks. As part of our free CSS website design guide this tutorial teaches you how to design the smart website layout on your right. The steps involved in doing this are:
- Designing the website's header and footer
- Designing the website's background and navigation
- Placing photos and content into the website's design
We have completed Step B in the previous chapter and now move to Step C of the layout design process where we will show you how to place the website's photos and content into the design.
You Are Here ::: Home >> Free Tutorials >> Website Design with Dreamweaver & Fireworks >> Website Layout Design
Step 2C: Placing website photos & content with Fireworks
The final step in the layout design process is to place your images. In this layout we have used two images of the girl, one in the footer and one in the left menu.
Placing the Footer Photo
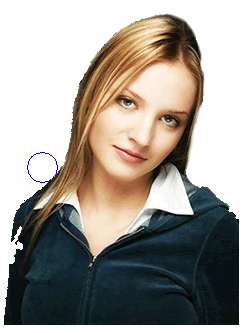
While using pictures in designing we often need to extract a particular part of the image. For this we can use any one of the various image extraction techniques possible in Fireworks. Basically we will remove the unwanted parts of the image with the magic wand tool and then smooth out the jagged finish with the eraser tool. This cool effect makes your pictures stand out and look really professional. Lets now learn how to extract the photo as shown in the sample design.
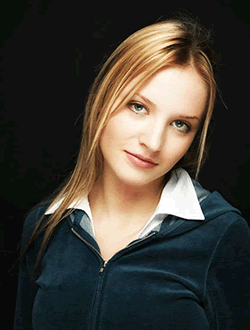
- Open a new Fireworks file and go to File >> Import (Ctrl+R) the image you would like to place in the design. Our example is shown below:
- Select the background black area that you would like to delete using the Magic Wand tool
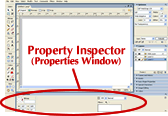
 and adjust the Tolerance level as 9 and Edge as Anti-alias. Tolerance represents the tonal range of colors that are select when you click a pixel with the magic wand tool. The Tolerance level is displayed in the Properties Inspector (Window >> Properties). After selecting the area satisfactorily, delete it. See the illustration below that will show how to set the tolerance level:
 - Once you have deleted the unwanted area you should get an image similar to the one shown below, the edges will be jagged and uneven.
- If you need to smooth out any imperfections in the photo edges using the Eraser Tool
 . Use the round eraser with some opacity (e.g. 50) and edge softness (e.g. 10). The image above shows how the edges are smoothened with the eraser tool and the final smooth edges image is shown below.
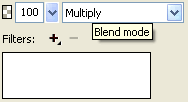
 - Copy this image and paste the image to the right bottom of the layout (work space) in the background and navigation layer. Select the image and set it's Blend Mode as Multiply. The Blend Mode is displayed on the right side of the Properties Inspector. See the image below that will show where the Blend mode option will appear.
After applying the Multiply Blend Mode the image will blend into the background of your layout.


Placing the Left Menu Photo
- We have used a second image in the design - the one under the navigation links. To place this photo into your design you need to first import (Ctrl+R) the image into your layout design.
Click the image, select the Scale Tool
 and then resize your image to width 103 pixels and height 102 pixels.
 - Now draw a rectangle using the Rectangle Tool
 width: 114 pixels and height: 112 pixels. Now set the Stroke Color to #B32D58 and set its Fill Color to the color of the menu area using the Color Picker. Now place the rectangle below the navigation links and the image on it.
 - Finally you need to paste the image inside the rectangle. Click and cut (Ctrl + X) the image. Then, select the rectangle and press Ctrl+Shift+V to paste the image inside the rectangle (Read the Paste Inside tutorial if required). Your layout in Fireworks should now look similar to the image below:
Insert Sample Content
To get an idea of how your website will look with the content inserted after converstion, its important to place some sample text on the designed layout. This will also help you in deciding the fonts and colors required for your text in the CSS styles formatting stage with Dreamweaver CS4.- For the website text we have chosen the Font - Verdana, Font Size - 13, Color - 330033, Anti-aliasing level - Crisp Anti-Alias. Similarly for the title we have chosen the Font - Trebuchet MS, Font Size - 18, Color - #CC3366, Anti-aliasing level - Smooth Anti-Alias and Font Weight – Bold. Your final layout design in Fireworks should look similar to the image below:
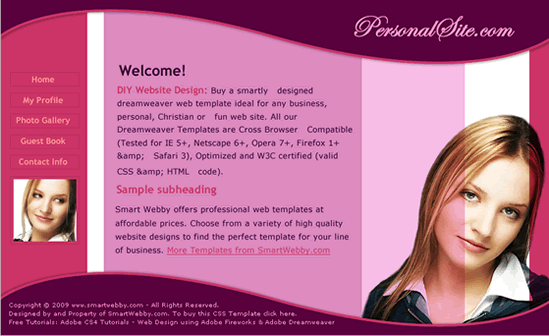
Congrats! Yo have now completed your cool website design using Fireworks.
The next step is Slicing and Exporting the website images needed to build the website using Dreamweaver.
Designing the website's background and navigation || Continue to Step 3: Slicing & Exporting the website's images
This CSS website design guide teaches layout design with Fireworks and CSS/XHTML website conversion with Dreamweaver. Learn CSS Web Design by following these simple steps:
- Introduction: How to make a Website
- Layout Design: Designing the website's layout with Fireworks
- Export Images: Slicing and Exporting the website images with Fireworks
- Dreamweaver Site: Setting up the website in Dreamweaver
- CSS Tutorial: CSS and XHTML website programming with Dreamweaver
- CSS Styles: Formatting the web pages using CSS style sheets in Dreamweaver
Software Required
Compatible Versions of Fireworks for this Tutorial
Note: The instructions in this tutorial are same across all Fireworks versions listed above; Screenshot images (if any) may differ. Adobe CS4+ users: Read the CS4+ version of this web design tutorial series - Design a Website. Recommended Version: Fireworks CS6