You Are Here ::: Home >> Dreamweaver Templates >> Template Customization Guide >> Custom Links
Website Links Customization
Modifying your website Links - Text links or Rollover links
- Some of our templates have Text Links while others have Graphic links.
A. For Customizing Text links:
- In Dreamweaver, the text links can be customized only in template.dwt (Code View). All you need to do is to click the link and modify it.
- Save the changes. When you save a template in Dreamweaver, a pop-up window will appear that will ask you if you want to update pages. Click the Update button. When all the pages are updated, click on Close button.
- To change the color of the text links or its hover effect, you will need to do it in the CSS Styles Sheet . Click here to learn how
B. For Customizing Graphics Links:
- In Fireworks, open template.png.
-
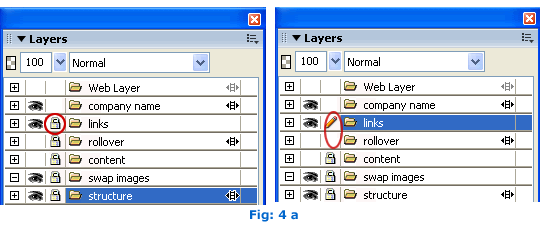
Open Layers panel (Window>>Layers or F2), then unlock the links and rollover layer by clicking the lock icon (Fig: 4 a).
- Select the link that you need to change by double clicking on the text link. If the links are grouped right click on the grouped links and select Ungroup (or Ctrl+Shift+G) to convert it as individual links. Make your changes and repeat the step for each of the links.
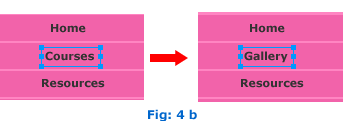
- Links can be converted from one text to another text as shown in the image below (Fig: 4 b).
- Once all the links have been modified its ready to get exported. If the
Layers panel is not visible in Fireworks, open the Layers panel by clicking
on Window>>Layers (or F2). In the Layers panel,
activate the Web layer by clicking
the eye icon. Now you will be able to see the slices for
all the links (a Green Translucent Layers will appear over the images). Right
click on each of the slice and select Export
Selected Slice. Export the slice to the images folder in the
local root folder and overwrite the existing image.
- Exporting the rollover images
- Open Layers panel (Window>>Layers or F2).
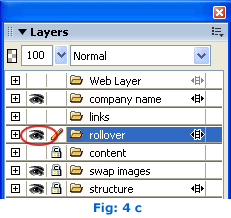
- Now invisible the links layer and visible the rollover layer by clicking the eye icon which is shown in Fig: 4 c.
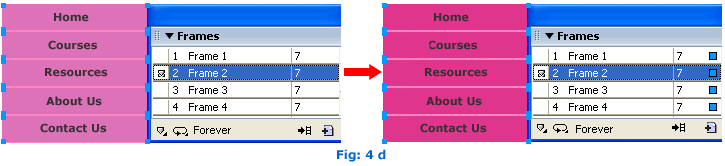
- If the Frames panel is not visible in Fireworks, open the panel by clicking the Window>>Frames (or Shift+F2). View the second Frame by clicking the Frame 2. Here you will see the rollover image.
- Now change the rollover color and text link in Frame 2.
- Select the color of rollover area of which you wish to change, pick your desired color.
- Rollover can be converted from one color to another color as shown in image below (Fig: 4 d).
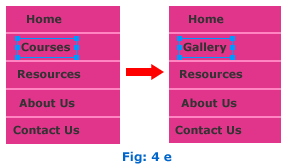
- Rollover links text can be converted from one text to another text as shown in image below (Fig: 4 e).
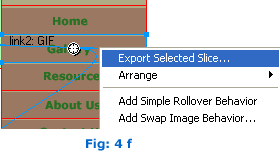
- Right click on the slice (where the changes are made), select Export Selected Slice (Fig: 4 f). Export the slice in to the image in the local root folder.
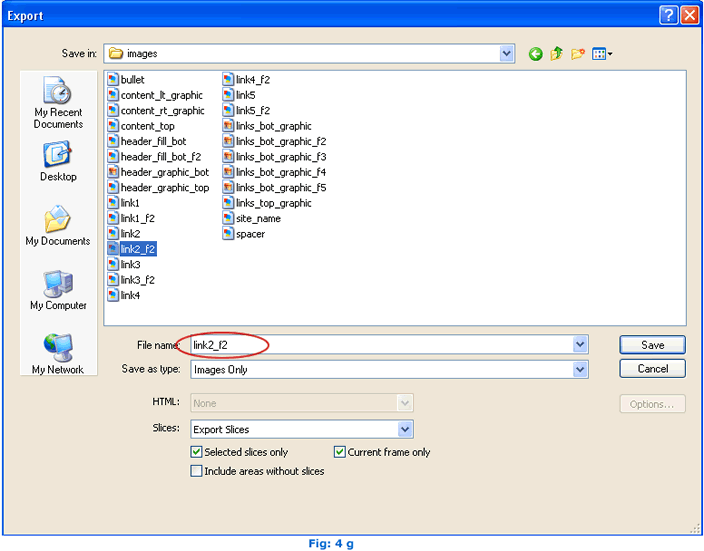
- In this time, when you export the links
add '_f2' to the name of the slice. All the rollovers have
'_f2' added to the name. E.g. The rollover image for link1.gif will
be link1_f2.gif, link2.gif will be link2_f2.gif etc., and overwrite the existing image.
Important: The slices have to be exported from Frame 2 and the names have to have an '_f2' added to it (Fig: 4 g).
Once the images are exported, it will be automatically reflected in the site.
To add new rollover button links
- We recommend you to add new button links in Dreamweaver, after you finish all the other changes
to your site, especially color changes and test your site in a browser (F12).
- Make a copy of the final template.png file and open it in Fireworks.
- Change the text for one or more rollover buttons in Frame 1 and Frame 2 (as described above).
- Now export the images as instructed above, except don't over write any of the existing button images, give new names to your buttons and export them (E.g. link5.gif and link5_f2.gif).
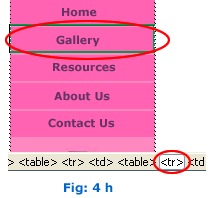
- In Dreamweaver, open the template file (template.dwt) in Design View.
- Click the button link which is closest to where you want to place your
new rollover button. In the tag inspector bar at the bottom of your
dreamweaver window you will see the image tag highlighted <img>.
Next to it you will find the <a> tag and most probably a <td>
tag. Click on the <td> tag in the 'tag inspector' and view
your page to check if it contains only one single button (similarly check
the <tr> tag and upwards until you know upto which tag contains only
the single button). Now (assuming that the <tr> tag was the
highest that contained only the button), click on the <tr> tag in
the 'tag inspector' to select only the single button code (Fig: 4 h).
- Press Ctrl+C to copy the code.
-
Now click the button (<img> tag highlighted) and press right arrow key to place the link below or left arrow key to place the link above.
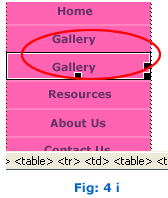
- Now press Ctrl+V to paste the copied code. Another button will appear as shown in Fig: 4 i .
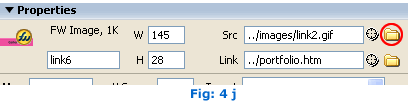
- Select a newly added button, then goto Properties and click on the folder (fig: 4 j) in Src file.
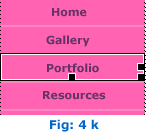
- The local root folder will open automatically, select newly named link button (Fig: 4 k).
- Note that, it is important
that the name of the new button is unique from the others and is also specified
in the onMouseOver property for the rollover to work properly.
- Save and update your template. Test your files. The new rollover should work perfectly.
Deleting extra links
If you'd like to delete unwanted buttons or links, select the button or link in the Dreamweaver template and delete it.
SmartWebby.com Dreamweaver Template Customization Guide
- Step 1: Dreamweaver Site Definition - Setting up your template website in Dreamweaver
- Step 2: Custom Colors - Changing your dreamweaver template's design colors
- Step 3: Custom Header - Customizing the website header with your Site Name and Slogan
- Step 4: Custom Links - Modifying your website Links - Text links or Rollover links
- Step 5: Custom Footer - Changing the website's Footer Text
- Step 6: Custom Graphics - Replacing Photos and Images used in your template's design
- Step 7: Custom Content - Inserting Content into Existing Pages and Adding New Pages
- Step 8: Custom Styling Text - Changing your text styling using CSS Styles
- Custom Flyouts - Modifying your dreamweaver template's Drop-down Menus if included
- Custom Scroller - Customizing the News Scroller if included
- Custom Swaps - Customizing the Swap Images if included