You Are Here ::: Home >> Dreamweaver Templates >> Template Customization Guide >> Custom Header
Website Header Customization
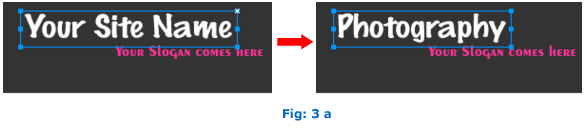
Customizing the template's Header with your Site Name and Slogan
- In Fireworks, open template.png (The .png can be opened only in Fireworks 4.0 and higher versions).
- Double Click the Your Site/Company Name and edit it with your company name (Fig: 3 a).
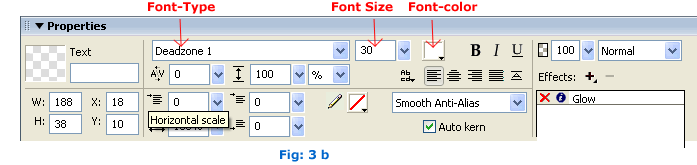
- You can also adjust the Font type, Size and Color in Window>>Properties panel (or Ctrl+F3) found below the stage.
- Repeat the above step for the slogan if it exists. Make desired changes to other existing header elements (if any).
Exporting Images
- Once all the Header elements have been satisfactorily modified we need to export the design changes as images to our website images folder. For this:
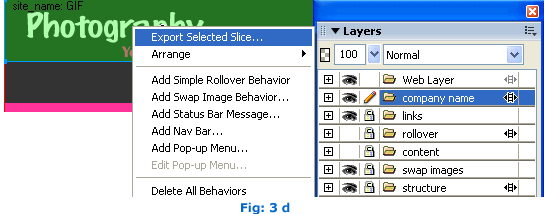
- In the Layers panel, make visible the Web layer by clicking on the eye icon next to the layer (Fig: 3 c). You will now be able to see all the slices present.
- Important Note before you export your slices: If any other slice is overlapping on a slice to be exported then it will interfere with the export and the resultant images will be incorrect (usually extra images are formed which you will have to delete). For example in Template 1111 the navigation links appear in the sliced header image area and have tiny slices on the flower icons that will interfere with the export of the header image. Please do the following steps before exporting the slice in such cases of overlapping slices:
- Hide anything that shouldn't be visible. In this case, hide the links Layer so the links don’t appear in the header image (as these are text links that are coded in and need to be edited from within the template.dwt file).
- Next, please select the two tiny slices on the icons and cut them (Ctrl+X/Command+X) to temporarily remove them from the layout. Now export your header slice (it will not have any overlapping slices now) to the images folder. Don't forget to immediately get back the icon slices that were removed by using either undo (Ctrl+Z/Command+Z) or paste (Ctrl+V/Command+V).
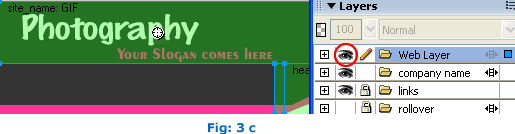
- Right click the slice found over the company name and click the Export Selected Slice (Fig: 3 d). Export the slice image to the images folder in the website template root folder and
overwrite the existing image (check to see if an image with the same name exists to know you are in the right folder).
- Once exported correctly the image(s) will automatically be reflected in the site pages when viewed.
Changing the Size of Sliced Images
Please note: The size of the slice should not be changed (unless you know how to do it without affecting the layout). Make sure that the Site/Company name fits within the slice. You can adjust the text size if the name is too long.
In case you are sure that the changes in dimensions cannot be avoided please do the following:
- Extend the size of the Company Name or Site Name slice to fit your changes and export the image to the images.
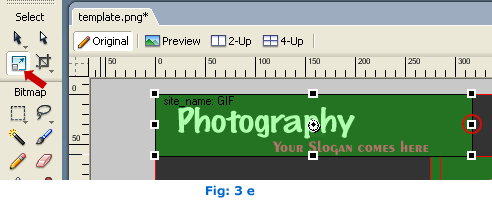
- Select the Slice which you choose to expand, then select the scale tool as shown by an arrow in Fig:3 e.
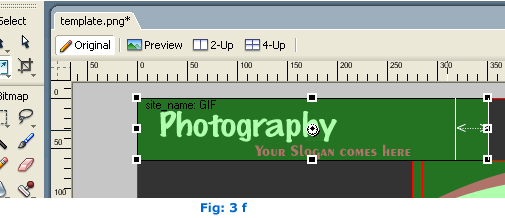
- Then drag the portion circled below (a double headed arrow appears), extend it to your desired length as shown in Fig: 3 f.
- Then Export the changed Slice to the image in the local root folder and overwrite the existing image.
-
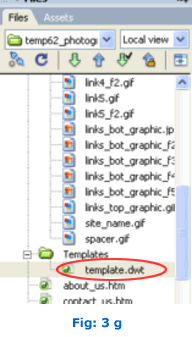
In Dreamweaver, open template.dwt (it will be present inside the template folder) as shown in Fig: 3 g and click the image (which will be
distorted due to the changes).
- In the Properties panel you will find that the width dimension is in bold and there will be a interconnecting refresh icon inbetween the two dimensions as highlighted in Fig: 3 h. Just click on it and it will resize you image.
- Finally Save (or Ctrl+S) and update your template and your changes will take effect.

SmartWebby.com Dreamweaver Template Customization Guide
- Step 1: Dreamweaver Site Definition - Setting up your template website in Dreamweaver
- Step 2: Custom Colors - Changing your dreamweaver template's design colors
- Step 3: Custom Header - Customizing the website header with your Site Name and Slogan
- Step 4: Custom Links - Modifying your website Links - Text links or Rollover links
- Step 5: Custom Footer - Changing the website's Footer Text
- Step 6: Custom Graphics - Replacing Photos and Images used in your template's design
- Step 7: Custom Content - Inserting Content into Existing Pages and Adding New Pages
- Step 8: Custom Styling Text - Changing your text styling using CSS Styles
- Custom Flyouts - Modifying your dreamweaver template's Drop-down Menus if included
- Custom Scroller - Customizing the News Scroller if included
- Custom Swaps - Customizing the Swap Images if included