Flash & ASP Integration: Preparing the Stage
Starting up on your Flash and ASP application
To get started with integrating Flash and ASP you will need to prepare the stage first. In this step of our Flash and ASP integration guide you will do the following:
- Create the Access Database required for your form.
- Create the basic Interactive Flash interface required for creating an interactive Flash Guest-Book.
- Create an empty ASP file and a HTML file to close the guest-book on exit.
Note: Values or code you will have to enter are given in light blue and red Italics show specific settings to be followed by you. All ASP code can be directly cut and pasted into your file. Comments in ASP are in bold green.
Database Creation
- Open your 'Microsoft Access' program that comes with 'Microsoft Office' and select the option 'Blank Access Database'. Call the database 'dbGuestBook' and save it in a new folder called 'GuestBook' under your site root.
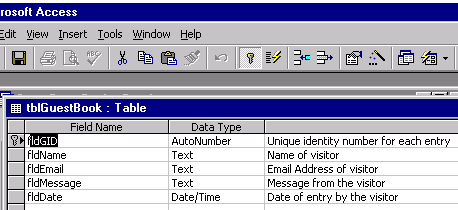
- Double Click on 'Create Table in Design View'. Give names to your fields (with prefix 'fld') and choose the 'Data Type' from the drop down menu. The description field is optional. For the Guest-Book you can replicate the Table Design as shown in the Screenshot below. Make the identity field (fldGID) as the primary key by clicking the field and then the 'key icon' in the tool bar as shown below.
Table 'tblGuestBook' Design

- Now save
 the table and call it 'tblGuestBook'. That's it your database is ready!
Basic Flash Form Interfaces
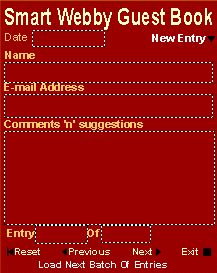
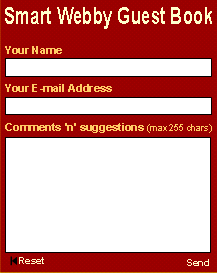
- Open Adobe Flasy (Macromedia Flash prior to version 8). To make a form you will need to know only a few basics. Open a new file and insert a blank frame (click F5 after selecting the first frame) in the first layer. Now create two interfaces similar to those displayed below in the next two frames i.e. 2nd and 3rd.
- The first frame should be the 'Display Form' to display data got from the database. The second frame should be the 'Input Form' to get data from the user and insert it into the database. Now name the layer by double clicking it and typing in 'guestbook'. Create a new layer above the first and name it 'counter' and another one below named 'background'. A few instructions to create the forms:
- Make the common interface to be shared by all frames in the first frame of the background layer. In our case it was the 'SmartGuestBook' text, background red rectangle and the 'side bar' (not seen below, see it in our site Guest-Book).
- Make the required buttons displaying 'New Entry','Reset','Previous','Next','Exit' and 'Send'.
- Make a button displaying 'Load Next Batch of Entries' and place this button inside a movie clip called 'LoadNextBatch'. Place an instance of this movie clip on the form as shown. Now double click it and give it the instance name 'LoadNext'.
- Use the Text Tool
 to write any text to be displayed on your interface e.g. 'Smart Webby Guest Book'.
- Use the Text Tool's Text Field
 option to create the dynamic text fields (the ones with the transparent backgrounds in the display form) and the input boxes (the ones with the white backgrounds in the input form).
- Right click the text fields to get to their properties tab. Disable 'Draw border and background' option in the properties display for the dynamic text fields and Enable 'Draw border and background' option in the properties display for the input boxes text fields.
Flash Guest-Book Form examples


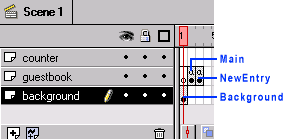
- Give the first frame ('Display form') the label 'Main' by double clicking it to get the frame properties. Label the second frame 'NewEntry' and the 1st frame of the background layer as 'Background'.
- In frame properties in the actions tab, give the command 'Play' (by selecting it from the dropdown list when you click on the plus(+) button) for the Main frame and 'Stop' for the NewEntry frame. Now save the Flash (.fla) file as GuestBook.
- Check List
- Make sure that you haven't missed out any fields or buttons in the forms above.
- Make sure that your Flash file Timeline' looks like the one below:

Create Empty ASP files and a HTML file to close the guest-book window on exit
- Open Macromedia Dreamweaver or any other ASP tool. Create a blank HTML file and view its code.
- The HTML file will most probably have the following lines.
<html>
<head>
<title>Untitled Document</title>
<meta http-equiv="Content-Type" content="text/html; charset=iso-8859-1">
</head>
<body bgcolor="#FFFFFF">
</body>
</html>
- Remove every line of code from the page to get a blank code less one.
- Now add the code given below.
- Save this file and rename it as GuestBookSendCode.asp. Copy and paste this file to the same folder and rename the copy as GuestBookGetCode.asp Now your ASP files are ready.
- Take another blank HTML file and place the following code in it. The changes to the file are shown in red.
<html>
<head>
<title>Window Closer</title>
<meta http-equiv="Content-Type" content="text/html; charset=iso-8859-1">
</head>
<body bgcolor="#FFFFFF" ONLOAD="self.close()">
</body>
</html>
- This file closes the window in which it is opened. Save this file as closewindow.htm
- Important Note: Place all the above files (database and pages) and those that you will further make in the same folder called 'GuestBook' under your site root.
Starting code for a basic HTML-less ASP file
<%@LANGUAGE="VBScript" %>
<%
'Make all variables compulsory to be declared
Option Explicit
'Turn buffering on
Response.buffer=True
'Make the page expire immediately so that it doesn't stay in the accessing computer's cache when called again
response.Expires=-1500
%>
Continue to Step 4: Sending data from your Flash form to the Database
This tutorial covers the usage of ASP and Flash to bring about Flash dynamic data display and manipulation i.e. interactivity into Flash:
- Flash and ASP Introduction
- Basics of Flash and ASP
- Preparing the Stage
- Sending Data from your Flash form to the database
- Getting Data from the database into your Flash form
- Flash preloader that waits for the data to load
- Validation of fields in Flash forms using JScript and VBScript