Optimize GIFs
GIF Images optimization explained
Adobe Fireworks is the ideal tool for creating and exporting web graphics. In this tutorial you will learn how to export optimized GIF graphics using Fireworks especially images that have a gradient effect used.
Export GIF Images
Once you have designed your graphic image, the next step is to export it for use in your website or application. If your canvas is already the size you need the image in then skip the next step. In most other cases you'll need the image to be of a smaller size so you need to draw a slice around it.
Slice your Image: For this you need to first select it and add a Slice on it (Alt+Shift+U). When using slices make sure that you have selected the slice (click on it) as each slice can have its own export settings.
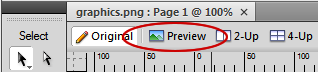
 Exporting a GIF Image: Open the Optimize panel for setting the document's default export settings or for the selected slice. The optimized setting for a regular graphic is the GIF Adaptive 256 setting (as shown in the screenshot). You can view how the GIF file will look on the web using the Image Preview button. The Preview button can be found in the top left corner of your canvas (as shown below). Fireworks Preview is Live so you can make changes in the Optimize panel and see it get updated instantly.
Sometimes you'll find that the GIF image previewed is not satisfactory in quality - this is especially true for graphics where gradient fills are used. Below we have discussed how to rectify this issue.
GIF Images with Gradient
Lets see how a gradient fill affects the GIF image quality. In our example below we have drawn a rectangle and applied a linear gradient effect. We next draw two slices on the vector using the slice tool ![]() followed by selecting both slices (keep shift key pressed when you click on the slices).
followed by selecting both slices (keep shift key pressed when you click on the slices).
We now open the Optimize panel for our export settings and select GIF Adaptive 256 for both the slices. After setting the export option switch to the Image Preview View. You will see that the output image will not be a clean gradient but be slightly pixilated. To get a clear and smooth gradient we need to change the Indexed Palette value which is by default Adaptive to Exact so the image contains all the colors of the gradient fill. Unselect the second slice and set its Indexed Palette to Exact as shown below. Notice how the number of colors have increased for the Exact option.
The image below shows the difference in the Image Preview View for the slices with Adaptive and Exact settings:
Transparent and Animated GIFs
Read the following tutorials that deal with transparent background GIF images and Animated GIF images.
Compatible Versions of Adobe Fireworks for this Tutorial
Adobe Fireworks CS3 & below users: For lower versions of Fireworks, some features, steps and screenshot images may differ. Recommended Version: Fireworks CS6