Adobe Dreamweaver Forms
Forms are essential for interacting with your visitors. This tutorial teaches you how to create Dreamweaver forms; How to customize a Dreamweaver form's container, input elements (like text boxes, text areas and select list) and its submit button; How to validate a Dreamweaver form using inbuilt Dreamweaver Behaviours.
Compatible Versions of Dreamweaver for this Tutorial
Note: The instructions in this tutorial are same across all Dreamweaver versions listed above; Screenshot images (if any) may differ. Recommended Version: Dreamweaver CS6
Create a Dreamweaver Form
Forms consist of a form tag enclosing the form elements, usually a HTML table with form fields inside it. To create a dreamweaver form you need to first insert the Form tag for it. Go to Insert > Form > Form. Once you insert the form tag, a red color dot outline will appear as shown below (the form tag is invisible in browsers though):
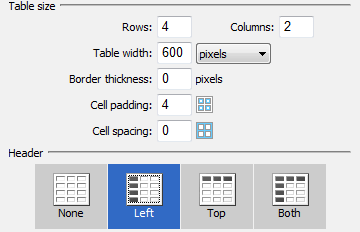
Keeping your cursor inside the red dotted box you need to now insert a Table by clicking Insert > Table, a pop-up window will appear. In the pop up window set the Rows as 4, Columns as 2, Table Width as 600, Border Thickness as 0, Cell Padding as 4, CellSpacing as 0 and Header as the second option. The snapshot of the Table window with the properties set is shown below:
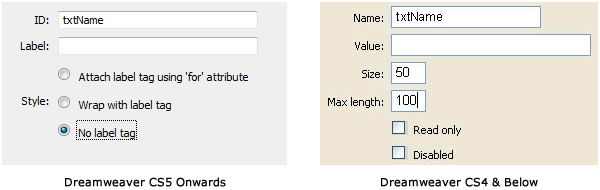
After inserting the table, click on first column cells and type the name of the fields as Name, Email Id and Phone No in the first three rows; Now in the right column insert a text field in each of the first three rows and name them txtName, txtEmail and txtPhone. To insert a text field click Insert > Form > Text Field and set the field properties in the window as shown below. The prefix for naming of fields in your forms should be consistent throughout your project and the standard way is to use "txt" as the prefix in naming Text fields. Similarly, we use "lst" as the prefix for select lists, "opt" as the prefix for Radio Buttons, "btn" as the prefix for Buttons, etc.
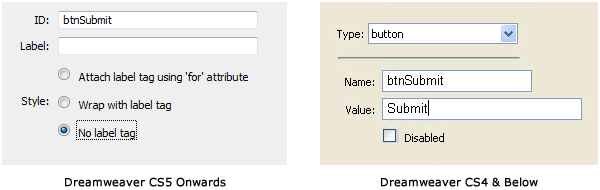
Finally insert a Button in the forth row second column using Insert > Form > Button with the name btnSubmit and value Submit, as shown below:
Once the Submit button appears on the form click to select it and in the Properties window set its action from None to Submit Form if its not set to Submit Form by default. All properties set till now can be modified using the Properties panel when clicked on an element or when the related tag is selected. That's it, your simple Dreamweaver form is ready and should look like the screenshot below:
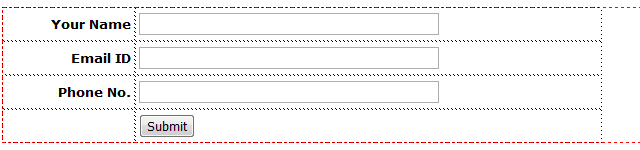
In the browser your form should now look something like this:
Form Customization
We are going to now show you how to easily customize the simple form above into the form shown below:
For the next step it is recommended you know how to add a style sheet to your document and should have one ready and linked for the web page in which the form is. If your style sheet is called styles.css then open it in a seperate tab in Dreamweaver using the Related Files toolbar (just above the Code | Split | Design View buttons) - right click on styles.css and select "Open as Seperate File" as shown below:

At the end of the style sheet just copy and paste the following CSS styles:
table{border:1px solid #CEEFFF;font-family:Verdana, Geneva, Arial, sans-serif; font-size:14px;

}

th{background-color:#CEEFFF; padding-right:10px; white-space:nowrap; min-width:120px; color:#036;

}

td{background-color:#E8F8FF;

}

input{font-family:Verdana, Geneva, Arial, sans-serif; color:#036; font-size:16px;

}

input[type="text"]{border:1px solid #82D7FF; margin:5px 6px 2px; height:20px; -moz-border-radius:8px; -webkit-border-radius:8px; border-radius: 8px; padding:2px 8px 4px;

}

input[type="button"]{font-weight:bold; padding:6px 12px;border:1px solid #82D7FF; margin:2px 6px 5px;  -moz-border-radius:8px; -webkit-border-radius:8px; border-radius: 8px;

background: #1e5799; /* Old browsers */

background: -moz-linear-gradient(top,  #82D7FF 0%, #2989d8 100%); /* FF3.6+ */

background: -webkit-gradient(linear, left top, left bottom, color-stop(0%,#82D7FF), color-stop(100%,#2989d8)); /* Chrome,Safari4+ */

background: -webkit-linear-gradient(top,  #82D7FF 0%,#2989d8 100%); /* Chrome10+,Safari5.1+ */

background: -o-linear-gradient(top,  #82D7FF 0%,#2989d8 100%); /* Opera 11.10+ */

background: -ms-linear-gradient(top,  #82D7FF 0%,#2989d8 100%); /* IE10+ */

background: linear-gradient(to bottom,  #82D7FF 0%,#2989d8 100%); /* W3C */

filter: progid:DXImageTransform.Microsoft.gradient( startColorstr='#82D7FF', endColorstr='#2989d8',GradientType=0 ); /* IE6-9 */

}
In the above code we have just added styles for the th and td tags and TextField and Button elements. When viewed in the browser you will now have a form similar to the example above.
Form Validation in Dreamweaver
Dreamweaver has inbuild behaviours which can help validate form fields without you having to know any Javascript programming. This feature is very useful for newbies and pure designers.
Validate Form Behaviour
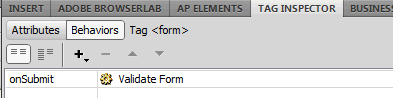
To locate the Validate Form behaviour go to Window > Behaviours, the Tag Inspector Panel will show up with the Behaviours Button as pressed. Just click on the plus (+) button shown and you'll see the Validate Form behaviour listed at the end. To validate your form you need to first select the form tag and then in the behaviours panel select onSubmit in the first property and then click the plus (+) button and select the Validate Form dreamweaver behaviour.
A pop-up window asks you to select each field on your form that need to be validated and set its validation requirement. The following screenshots shows the settings for each of the three TextFields in our form above and how they are validated.
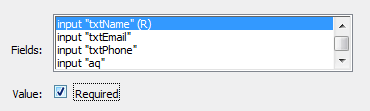 txtName requires only to be validated as a Required field.
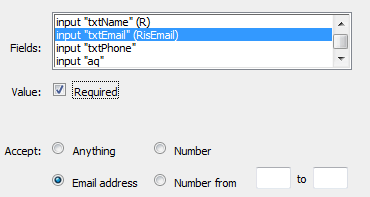 txtEmail requires to be validated as a Required field and an Email Address field.
 txtPhone requires to be validated as a Required field and an Number field.
Once your validation settings are done for the field click OK and your form validation using the Dreamweaver Validate Form behaviour is done! If you go to the code view you will notice that the Javascript required for the validation has been added to your head tag and your form onSubmit property. You now know how to quickly create your very own forms and how to customize and validate them using Dreamweaver.
Related Links: