Create Buttons
Make 3D button images in Fireworks
In this tutorial you are going to learn how to create three glossy button effects using Adobe Fireworks. These button effects include:
- A green start button that shines on the top and bottom to draw focus to the button text.
- A red reset button that's similar but with a cut-in-half glassy sheen.
- A blue submit button with a sublime 3D pressed fluid effect on top.
The samples of these button effects that we will teach you to create step-by-step are given below.


3D Button samples: Start Button, Reset Button, Submit Button.

Start Button
To design the green start button effect shown above do the following:
- Step 1: Open an new document in Adobe Fireworks and draw a rounded rectangle using the Rounded Rectangle Tool
 and set its Fill color to a gradient fill - go to Fill category >> select Gradient >> Choose Linear option.
 - Step 2: Now click the Fill color, and then click on the small color rectangle that is on the left side and set the color to #15501E.
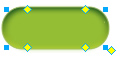
- Step 3: After that, click on the small color rectangle that is on the right side and set its color to #BAD32F. Give this a 1-pixel soft stroke with the color #9FBB66. The illustration below shows how your rounded rectangle should now appear:
- Step 4: Draw another Rounded Rectangle and place it over the first rounded Rectangle and set its Fill color to #94BE34 and Stroke color as none. Now apply a Feather of 5 to it. For this, click on Edge from Properties panel, choose Feather and set the feather value to 5.
- Step 5: Now draw a third Rounded Rectangle and place it over the previous Rounded Rectangles. Set the Fill color to a gradient fill - Fill category >> select Gradient >> Choose Linear option.
- Step 6: Now click the Fill color, and then click on the small color rectangle that is on the left side and set the color to #FFFFF7. Now click on the small color rectangle that is on the right side and set its color to #D4E076. The below image depicts how your button should look so far:
- Step 7: Cut the 3rd rounded rectangle into two - around 15 pixels in height from the top. For this, select the Rounded Rectangle using Subselection Tool
 , then select the Knife Tool
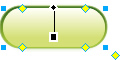
  and cut the Rounded Rectangle by dragging your cursor from the left side to the right. Now adjust the linear effect according to the height of the Rounded Rectangle and apply a Feather of 2 (click on Edge from Properties panel, choose Feather and set the feather value to 2). The resultant button should look similar to what's shown below:
 - Step 8: Now copy and flip the cut rounded rectangle vertically - Copy and Paste (Ctrl+C, Ctrl+V) then go to Modify >> Transform >> Flip Vertical. Move the Rounded Rectangle to the bottom and apply a Feather of 1.
- Step 9: Now click the Fill color, and then click on the small color rectangle that is on the left side and set the color to #96C932. Next click on the small color rectangle that is on the right side and set its color to #ECEC81. The image below shows how the reversed Rounded Rectangle should look:
- Step 10: Click the Text Tool
 , choose Font – Trebuchet MS, Font Size - 20, Color - #003300, Font Weight - bold, Anti-aliasing level - Smooth Anti-Alias and write "Start" or any other button text. Your Glossy button is ready and should now look like this:


Reset Button
Similar to the above green Start button by following the 10 steps for a red color palette instead of green you can create a glossy red button. Colors we have used include: #510000, #E8201F, #B89762 (step 1: 1px soft stroke), #E93730, #F0817A, #E93B34 and #F39791. To get a slightly different effect as displayed in our sample red button we need to modify Step 7 a little bit. Instead of cutting just a portion of the top for the 3rd rounded rectangle you should cut it into half as shown below. Also the Opacity should be set to 80 (change 100 to 80 - Opacity value located above Filters in Properties Panel).
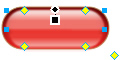
So now you have a brand new button effect by implementing just these minor changes. After adding your 'Reset' button text (color: #330000) your red reset button image should look like this:
Submit Button
For this button effect, similar to the green Start and red Reset buttons, we first need to create a glossy blue button following steps 1 thru 9 with these colors: #103C5A, #04A5E7, #0D7EAC (step 1: 1px soft stroke), #3799CD, #80C6EA, #2D98CC and #6ACCF3. After completing Step 9 please do the following:
- Step 10: We now need to take the top cut rounded rectangle behind the second rounded rectangle (which has feather 5). For this just select the second rounded rectangle and the bottom cut rounded rectangle (press shift then select) and then bring them forward (press Ctrl+Shift+Up Arrow). The image below shows how your button should look after these placement changes:
- Step 11: Now draw a white circle using Ellipse Tool
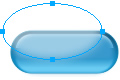
 on top of the Rounded Rectangle (Fill color as#FFFFFF, Stroke color as none) and then set its Opacity as 50. Now set a feather of 10 (click on Edge from Properties panel, choose Feather - default feather value to 10 should appear). This is how your button should almost look like now - adjust the ellipse to the position showed below:
 - Step 12: Since the ellipse has an opacity value it covers up some of the button's outline. To prevent this we need to make the ellipse to show only partially. To do this just duplicate the second rounded rectangle (copy paste) and Cut and Paste Inside the ellipse into it (Ctrl+X and then Ctrl+Shift+V). After this is done the copied rounded rectangle's blue fill will show so just select and change it to Transparent. Now add your 'Submit' button text (color: #000033) and your finished submit button will look like this:

Software Required
Adobe Fireworks: Since this tutorial covers a core feature of Adobe Fireworks, any version of it will do.Compatible Versions of Fireworks for this Tutorial
Note: The features and instructions discussed in this tutorial are same across all Fireworks versions listed above; Screenshot images may differ. Recommended Version: Fireworks CS6