How to make a 3D ball
How to create Three Dimensional Ball Graphic with Fireworks CS4+
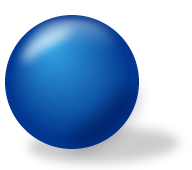
In this tutorial you are going to learn how to create three Dimensional ball vector graphic using Adobe Fireworks CS4+. The image below shows how we have created three dimensional ball.
Prerequisite Knowledge
This tutorial teaches you how to create a 3D ball using Fireworks and thus assumes you are familiar with some design software, even if you are new to Adobe Fireworks. However be assured that our detailed instructions can be followed by even a total novice.
You Are Here ::: Home >> Free Tutorials >> Adobe Fireworks CS4+ Tutorials >> 3D Ball Graphic Effect
3D Ball Graphic with Adobe Fireworks CS4+
Color Palette - 3D Ball Graphic
Follow steps given below:
-
Step 1: Open Adobe Fireworks CS4+ and create a new file (File >> New or (Ctrl + N)) of size 250x250 pixels.
-
Step 2: Draw a circle using Ellipse Tool
 with the dimensions of Width: 134 pixels and Height: 134 pixels set Fill Color as #01378F and Stroke Color as none. The Fill Colors and Stroke Colors are displayed on the left side of the tool bar.
 -
Step 3: Now we need to apply certain gradient effects to make the two dimensional circle into a three dimensional ball. In the following steps you are going to start with a circle and end up with a three dimensional ball. To do this we need to apply some gradient effects make it look like a ball. Select the circle and do the following options:
a. Select the Fill color go to Fill category >> select Gradient >> Choose Contour option
b. Now click the Fill color, and then click on the small color rectangle that is on the left side and set its color to #35A7E6.
c. After that, click on the small color rectangle that is on the right side and set its color to #01378F.
See the illustration below that will describe how the circle should appear: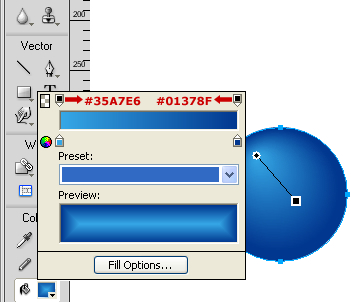
Gradient Settings: Adobe Fireworks CS4 Screenshot

Gradient Settings: Adobe Fireworks CS5 Screenshot
- Note: In Adobe Fireworks CS5 you can reverse the gradients using Reverse Gradients

-
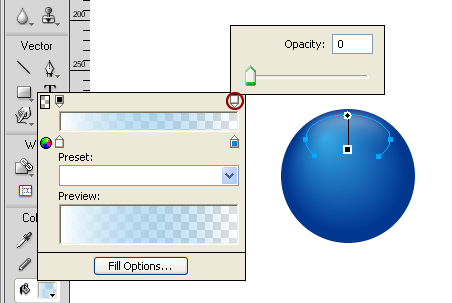
Step 4: Draw an ellipse using Ellipse Tool with the dimension of 85x42 pixels set the Fill Color as #0186D6 and Stroke Color as none. Place the ellipse on the top of the circle. To apply linear effect, select the ellipse and choose the following option:
a. Select the Fill color go to Fill category >> select Gradient >> Choose Linear option
b. Now click the Fill color, and then click on the small color rectangle that is on the left side and set its color to #FFFFFF.
c. After that, click on the small color rectangle that is on the right side and set its color to #0186D6 and set the Opacity as 0. - Step 5:
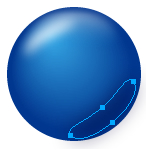
Select the ellipse using Subselection Tool
 . Now click the Knife Tool
  and cut the bottom part of the ellipse. To apply Feather Effect, click on Edge from Properties panel, choose Feather and set the feather value to 10. Now reduce the Opacity to 50. See the illustration below that will show how the ellipse is placed:
 - Note: In Adobe Fireworks CS5 you can reverse the gradients using Reverse Gradients
- Step 6:
Now you need to set the light effects, again draw an ellipse with the dimensions of 51x35 pixels set the Fill color as #FFFFFF (Solid) and Stroke color as none. To apply Feather Effect, click on Edge from Properties panel, choose Feather and set the feather value to 11. Now reduce the Opacity to 77 and rotate the ellipse using Scale Tool
 . Then, place the ellipse on the top left of the circle and adjusts the ellipse using Subselection Tool. See the image below that will describe how the ellipse is placed:
 - Step 7: If you are putting the light effect on top left of the circle, the shadow should appear on the bottom right of the circle. For this we need to draw another ellipse with the dimensions of 66x59 pixels set the Fill color as #000033 (Solid) and Stroke color as none. To apply Feather Effect, click on Edge from Properties panel, choose Feather and set the feather value to 21. Now reduce the Opacity to 50 and rotate the ellipse and place on the bottom right of the circle. Adjust the ellipse using Subselection Tool. The light shadow will look as below:
- Step 8: More over you have completed the 3D ball, now we need to apply shadow effect. To apply shadow effect, draw an ellipse using ellipse tool with the dimensions of Width: 150 pixels and Height: 36 pixels set the Fill color as #333333 and Stroke color as none.
- Step 9: Select the ellipse to apply Feather effect. Then, click on Edge from Properties panel, choose Feather and set the feather value to 11. Now reduce the Opacity to 25. Since the shadow should appear behind the ball, go to Modify >> Arrange >> Send to Back (Ctrl+Shift+Down arrow). See the illustration below that will show how the ellipse is placed:

Gradient Settings: Adobe Fireworks CS4 Screenshot
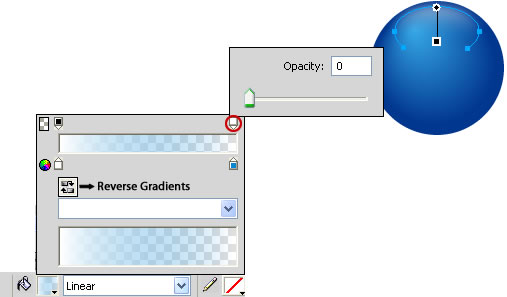
Gradient Settings: Adobe Fireworks CS5 Screenshot

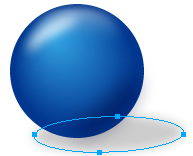
Finally the 3D ball will look as below:
Software Required
Adobe Fireworks CS4+. If you are using the CS3 and below version please read 3D Ball Graphic with Fireworks.
Compatible Versions of Adobe Fireworks for this Tutorial
Adobe Fireworks CS3 & below users: For lower versions of Fireworks, some features, steps and screenshot images may differ. Please read the CS3 & Below version of this free web design tutorial - 3D Ball with Fireworks.
Recommended Version: Fireworks CS6